November 3, 2026
16 Levels
The MPC workflow.
Inside Ableton Live.
Ableton Live 12 · macOS · Beta user guide
From the first sample to the finished arrangement. After the quick start, the chapters follow the MPC 2000XL Operator's Manual.
Start here
This short section gets you from a blank Live Set to a recorded pattern. The reference manual that follows keeps the organization and terminology of the MPC 2000XL Operator's Manual.
What you need
| Required | Notes |
|---|---|
| Live 12 Suite | Includes Max for Live. |
| Live 12 Standard + Max for Live | The Max for Live add-on must be installed. |
| macOS | Current beta requirement. Push 2 and Maschine integration use macOS-only components. |
| Audio input | To sample external audio, route an appropriate line-level source through your interface. |
| Optional controller | Any MIDI pad controller, a Push 2, or a Maschine MK3 or Maschine+. The instrument can also be operated from the computer keyboard. |
Installation at a glance
- Quit Live. Copy the complete 16 Levels folder into your Live User Library; do not remove bundled files, including node_modules.
- Copy 16 Levels Keys.als and 16 Levels Push.als from the included Templates folder into the User Library Templates folder.
- Restart Live and open a supplied template, or put 16 Levels.amxd on a MIDI track. Use Live > Settings > Library if the User Library is not at its default location.
- Save the Live Set before using SAMPLE > RECORD and KEEP.
Your key and the trial
16 Levels runs for 14 days without a key, counted from the first time it loads on your Mac. The status line and MIDI > OTHER show the days left. When the trial ends, the pads, the sequence and KEEP stop until a key goes in. Saving and loading still work, so nothing you made is stuck.
Your key comes in a text file with your name and 16 Levels License in its name. Do one of these:
- Put the file in the 16 Levels folder in your User Library. 16 Levels picks it up within a few seconds, even with Live open.
- Or open MIDI > OTHER, press KEY (F3), paste the key and press OK.
The key works offline and on every Mac you use. MIDI > OTHER shows your name on the version line once it's in.
Quick start with a Push 2
- Quit Live and double-click Push 2 setup.command. If macOS blocks it, right-click, Open, then Open again.
- Start Live. Settings > Link, Tempo & MIDI: set the Push2 Control Surface row to None, and turn Track off for the Ableton Push 2 (User Port) input.
- Open the 16 Levels Push template. The Push screen comes on with the MAIN page.
- The bottom four rows of pads are banks A and B, the top four are C and D. Buttons above the screen pick pages, buttons under it are F1 to F6, CLOSE and ENTER. Hold Record and press Play to record.
To give the Push back to Live: CTRL OFF, then set the Push2 row back to Push2. The full map is in Chapter 12.
Quick start with a Maschine
- Maschine+: connect USB, then Settings > System > Controller. Maschine MK3: connect USB.
- Quit the Maschine software if it's open.
- Put 16 Levels on a MIDI track and set MIDI > OTHER > CTRL to MASCHINE. Both screens come on.
- The pads play the bank on screen, GROUP A to D change banks. Buttons above the screens pick pages, a tap on a knob presses the soft key over it. Hold REC and press PLAY to record. SHIFT + REC is OVERDUB.
The Maschine software can't use the controller while MASCHINE is on. Set CTRL OFF to give it back. The full map is in Chapter 12.
Your first beat
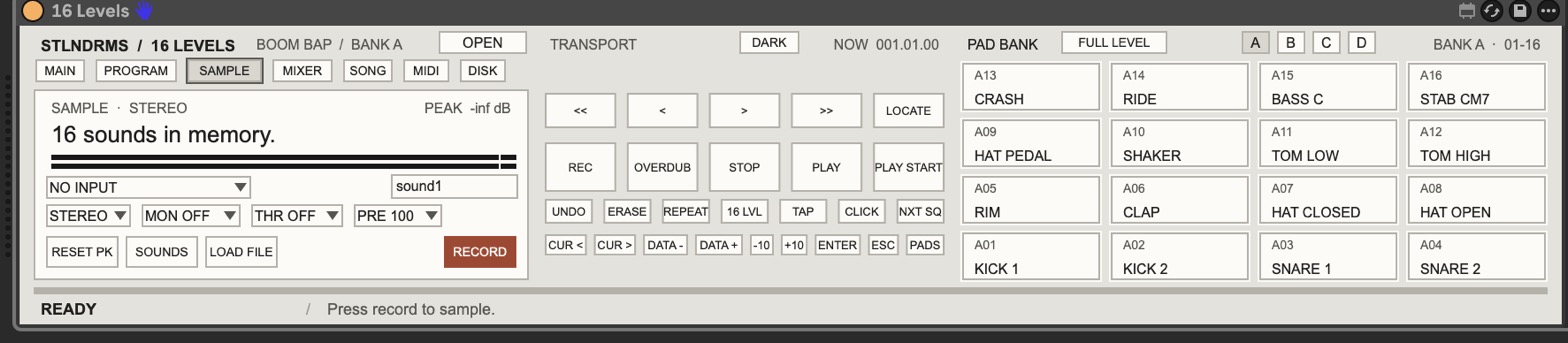
01 / Record a sound
- Connect your turntable or other source through the appropriate input chain and confirm a usable level at your audio interface. Use a phono preamp where the turntable requires one.
- On SAMPLE, select INPUT and MODE (STEREO, MONO L or MONO R). Choose THR OFF for manual recording, or set a threshold and optional PRE from 0 to 100 ms.
- Press RECORD, then START (F6). Play the source; press STOP (F6) when you have the material.
- Hit the destination pad, use PLAY (F4) to audition, then KEEP (F5). RETRY (F2) discards that take and records another. The other pads remain playable while you decide.
02 / Trim or chop
- Select the pad and open PROGRAM > PARAMS > TRIM.
- Adjust START and END; use SNAP to move to zero crossings and ZOOM for a closer view.
- To divide a sample, open TRIM > EDIT (F3), choose ZONES, set 2 to 16 zones, and use the on-screen DO IT command. The device can distribute zones across pads.

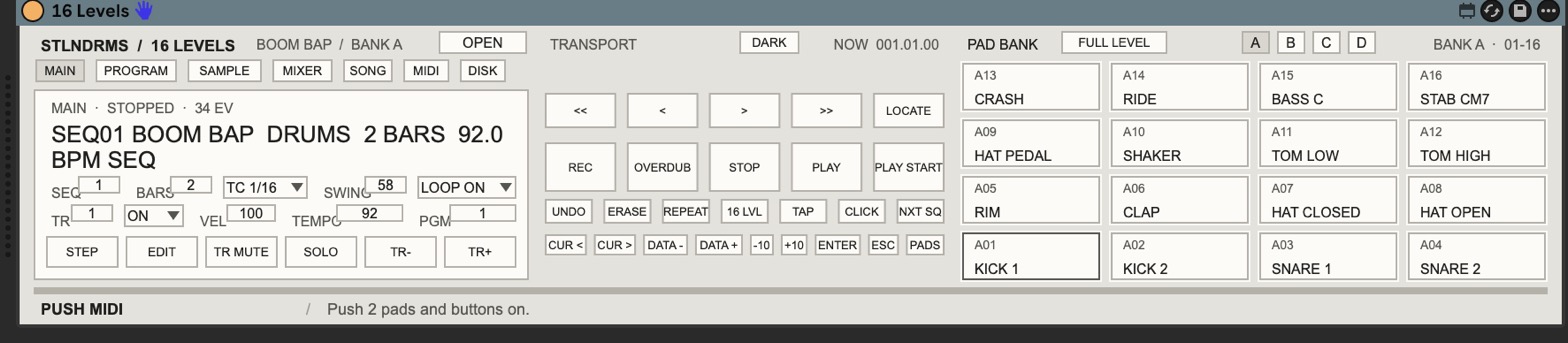
03 / Make a two-bar pattern
- On MAIN: set SEQ 01, BARS 2, TC 1/16 and LOOP ON.
- Use CLICK and COUNT REC if you want a count-in. Press REC followed by PLAY START and perform the pads.
- Press STOP. Use OVERDUB then PLAY START to add another layer without replacing the first. Hold ERASE with a pad during playback to remove those hits; UNDO reverses the last pass.
04 / Continue in Live
- Build additional sequences and use SONG to arrange them, or keep performing inside 16 LEVELS.
- Use MIDI > PRINT to place a sequence or song into a Live MIDI clip in Session or Arrangement.
- For separate audio processing, assign pad OUT 1 to 8 from MIXER > INDIV. The device creates the corresponding Live tracks as needed.
File safety and compatibility
Where your work lives
The current beta writes audio and project state beside the saved .als file, not inside the Live Set itself. The project folder looks like this:
| Relative path | Contents |
|---|---|
| 16levels/SOUNDS | Kept or loaded sounds as 24-bit AIFF. |
| 16levels/16levels.json | Programs, sequences, songs and settings; updated as you work. |
| 16levels/PROGRAMS, SEQUENCES, ALL | Files saved from the DISK page. |
Earlier beta projects may use an MPC folder and MPC.json instead. Those projects keep using the original names. Do not rename them just to match newer builds.
Running more than one 16 LEVELS in a Set, or copying one Set into another, has not been fully tested yet. During the beta, try those on a duplicate Set before relying on them with irreplaceable material. Use one 16 LEVELS instance per Set when using MIDI Port B (Chapter 11).
Destructive sample editing
MONO, RESAMPLE, DISCARD, SILENCE, REVERSE, NORMALIZE, DELETE SECTION, INSERT SOUND and TIME STRETCH change the underlying sound file. UNDO takes back the last one. Make a COPY SOUND or an external backup before irreversible edits to important material.
MPC 2000XL exchange
The MPC 2000XL import/export functions are designed for .ALL, .APS, .PGM, .SND and .MID files. Some 16 LEVELS settings cannot be written back to the XL, including pad-specific trims that differ from the sound trim, MUTE PROGRAM, and negative filter-envelope values. Keep a separate copy of your original XL project and test a round trip before relying on an exported disk image or session.
Push 2 takeover
Push 2 mode replaces Push's usual Live control-surface behavior while enabled. It needs a one-time macOS setup script and two changes in Live's MIDI settings. Change those settings back to return Push 2 to normal Live use (Chapter 12).
Maschine takeover
MASCHINE mode quits Native Instruments' background helpers so 16 Levels can use the controller. The Maschine software can't use it until you set CTRL OFF, which starts the helpers again (Chapter 12).
Reference manual
The following chapters keep the arrangement of the MPC 2000XL Operator's Manual, with safety and compatibility notes marked.
16 Levels is a sampler and sequencer that works like an MPC 2000XL and MPC 3000, built as one Max for Live instrument for Ableton Live 12. You sample, chop, assign to pads, build sequences and songs, and play it from the computer keyboard, a pad controller, a Push 2 or a Maschine. Live is the clock, the mixer and the place your audio goes.
Introduction
This guide follows the order of the MPC 2000XL Operator's Manual, chapter for chapter, so anyone who learned on the XL finds things where they expect them. Where 16 Levels works differently because it lives in Ableton Live, the chapter says so.
Features
| Area | 16 Levels |
|---|---|
| Pads | 16 pads, banks A to D (64 in all), FULL LEVEL, 16 LEVELS, Note Variation |
| Sequencer | 99 sequences, 64 tracks each, 96 ticks per quarter note, Timing Correct with swing, Note Repeat, real-time erase, step edit, 20 edit functions, tempo changes |
| Songs | 20 songs built from steps of sequences, convert a song to one sequence |
| Sampling | Record from Live's inputs with threshold and pre-record, Keep or Retry, load WAV and AIFF |
| Sounds | Trim, loop, zones, edit tools, mono and stereo, resample, BPM Match |
| Programs | 24 Programs, Voice Overlap, mute groups, envelope, filter and filter envelope, tune, layers and velocity or decay switching |
| Mixer | Stereo mix per pad, individual outs 1 to 8 on their own Live tracks, four drum mixers |
| MIDI | MIDI tracks to outboard synths on two ports (32 channels), note maps, LEARN, print to Live clips |
| Disk | Save and load inside the project or a shared library; read and write MPC 2000XL files |
| Control | Computer keyboard, any pad controller with learned buttons, Ableton Push 2 with its screen, Maschine MK3 or Maschine+ with both screens |
What you need: Ableton Live 12 Suite, or Live 12 Standard with Max for Live, on a Mac. The Push 2 and Maschine modes use macOS-only parts. A pad controller, a Push 2 and a Maschine are optional.
Panel descriptions
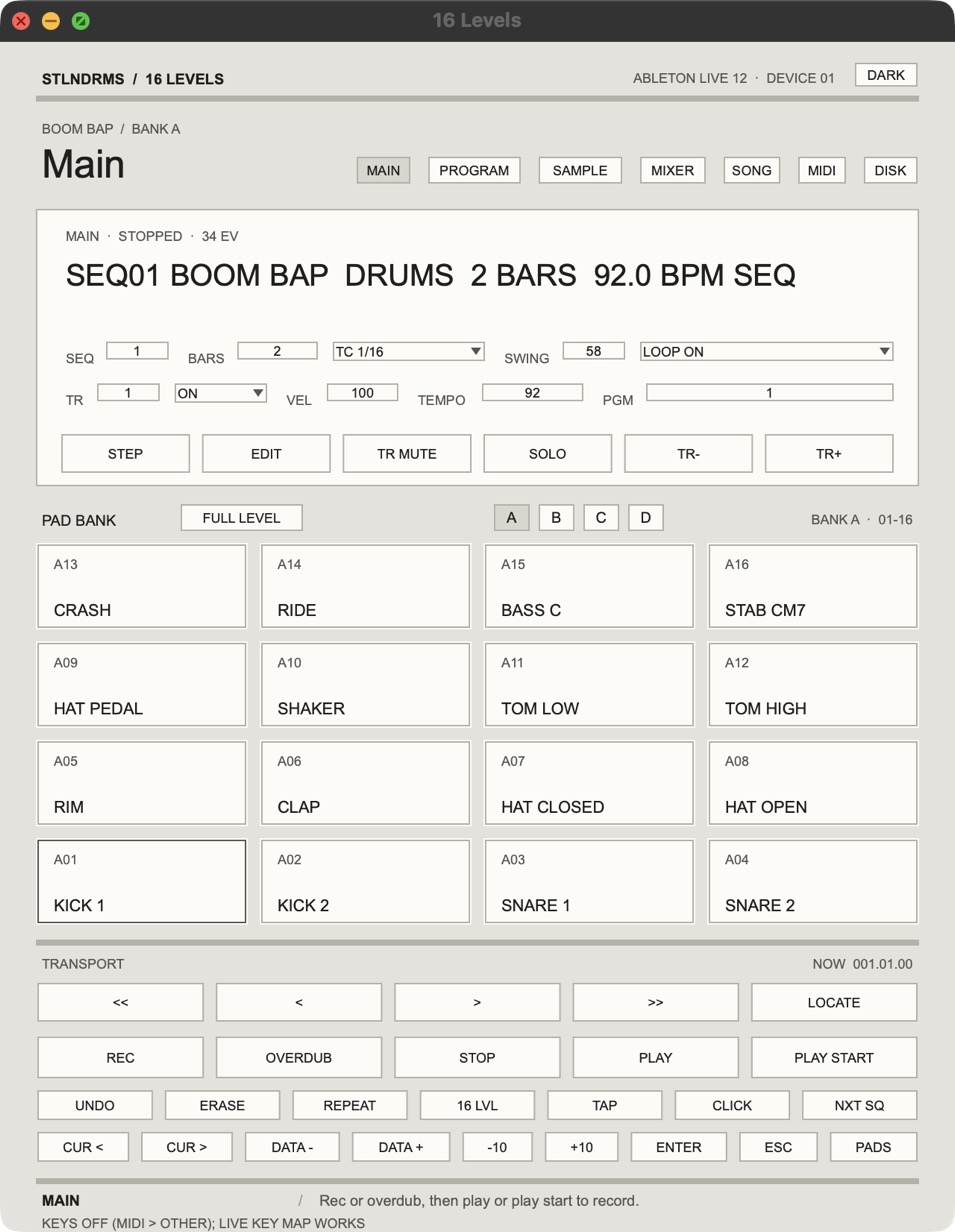
16 Levels has two views of one panel. The strip sits in Live's device panel at the bottom of the screen.
OPEN shows the same panel in its own window, bigger, with the screen up top, the pads in the middle, and the transport and panel keys under them. Both views stay in step.
| Part | What it does |
|---|---|
| Page keys | MAIN, PROGRAM, SAMPLE, MIXER, SONG, MIDI, DISK. The XL's mode keys, one page at a time |
| Screen | A label line, a main line, and the fields for the page |
| Soft keys | The six keys under the screen are F1 to F6. Their labels change with the page; every window has CLOSE |
| Transport | << < > >> and LOCATE on top; REC, OVERDUB, STOP, PLAY, PLAY START under them |
| Panel keys | UNDO, ERASE, REPEAT (Note Repeat), 16 LVL, TAP, CLICK, NXT SQ |
| Cursor and data keys | CUR < and CUR >, DATA - and DATA +, -10 and +10, ENTER, ESC, PADS. The XL's cursor keys and DATA wheel |
| Pads | 16 pads, A01 lower left to A16 upper right. Bank keys A to D and FULL LEVEL above them |
| Status line | What just happened, then what to do next. The OPEN window adds a key hint line |
| OPEN, DARK | OPEN shows the big window. DARK switches the screen to dark greys |
Installing
The XL loaded its operating system from floppy. 16 Levels installs by copying files.
- Quit Live.
- Copy the 16 Levels folder into ~/Music/Ableton/User Library/. Keep everything in it together, node_modules included.
- Copy both templates from Templates into ~/Music/Ableton/User Library/Templates/: 16 Levels Keys.als (keys mapped) and 16 Levels Push.als (keys mapped, Push 2 on).
- Open Live. Browser > User Library > 16 Levels, and drag 16 Levels.amxd onto a MIDI track. Or open a template.
- Save the Live Set before you keep your first sample.
If your User Library is somewhere else, Live > Settings > Library shows where.
When you copy a new version over an old one, delete the device from the track and drag it back in, or reopen the Set. Live reloads it on its own but can keep the old Push 2 helper running.
The basics
Hooking up in Live
On the XL you ran cables. Here Live does the routing.
| Connection | How it works |
|---|---|
| Main out | 16 Levels is an instrument on a MIDI track. Its stereo mix comes out of that track |
| Individual outs | Pick OUT 1 to 8 for a pad on the MIXER page. The first time, 16 Levels makes a Live audio track named MPC OUT n for it |
| Pad input | Notes into the track play pads: a pad controller, a keyboard, the Push 2 or a Maschine |
| Sampling input | INPUT on the SAMPLE page lists Live's inputs. Record from a turntable, a synth, or another track |
| MIDI out | MIDI tracks play out of the device. Another Live MIDI track with MIDI From set to 16 Levels sends them to a synth |
| Clock | Live's transport. PLAY and PLAY START start Live; Space in Live starts 16 Levels |
The terms
The same words the XL used.
| Term | Meaning |
|---|---|
| Sequence | A pattern, 1 to 999 bars, made of up to 64 tracks. 99 per project |
| Track | One line of performance inside a sequence. A drum track plays a Program; a MIDI track plays out to a synth |
| Song | A list of sequences in play order, each repeated as many times as you set |
| Sound | One sample in memory, saved as an AIFF |
| Drum pads | The 16 pads. With four banks, 64 pad slots |
| Note number | Each pad slot has a MIDI note, so sequences store notes and controllers can play pads |
| Program | Which sound each pad plays and how: level, pan, tune, envelope, filter, overlap, mute groups. 24 per project |
Operating the panel and screen
Press a page key to change pages. Each page has fields; the one you are editing is the cursor field.
- Cursor: click a field, or use CUR < and CUR >. A red border marks it.
- DATA: DATA - and DATA + turn the value one step, -10 and +10 ten steps. Dragging a field with the mouse works too.
- Numbers: with the keyboard layer on, type a number and press ENTER.
- Soft keys: F1 to F6 under the screen do what their labels say. CLOSE backs out of a window.
Playing the pads, PAD BANK and FULL LEVEL
Hit a pad to play it. Its velocity sets the level. Bank keys A to D switch which 16 sounds the pads play. FULL LEVEL plays every hit at velocity 127.
Selecting Programs
PROGRAM page, PGM field: 1 to 24. A new number makes an empty Program. Each sequence track picks its own Program in its PGM field on MAIN.
Note Variation
Note Variation changes one parameter of a pad as you play: TUNE, DECAY, ATTACK or FILTER, within a LO and HI range you set. The XL used a slider; here the value is a Live parameter, so map it to a knob with Live's MIDI Map. AFTER applies it after the hit, the way the XL's AFTER key did. Set it up under PROGRAM > PARAMS > NOTE VAR.
16 Levels
16 LEVELS spreads one pad's sound across all 16 pads, stepped by VELOCITY, TUNE, FILTER, ATTACK or DECAY. Press 16 LVL, pick the type, hit the pad to use. For TUNE, ORIGINAL KEY sets which pad plays it at its normal pitch. Press 16 LVL again to turn it off.
Recording sequences
How sequences are organized
A sequence holds up to 64 tracks and runs 1 to 999 bars. Positions read as bar.beat.tick: 003.02.48 is bar 3, beat 2, tick 48. A quarter note has 96 ticks, so a 16th is 24 ticks and an 8th triplet is 32.
Example 1: recording a drum pad performance
- MAIN page. SEQ 01, BARS 2, TC 1/16, LOOP ON.
- CLICK: set COUNT REC so you get a bar to come in on.
- Press REC, then PLAY START. Play a kick and snare. The sequence loops.
- Press STOP. Press OVERDUB, then PLAY START, and add hats. Overdub keeps what is there.
- Missed one? Hold ERASE and hold that pad as the playhead passes it. Or press UNDO to take back the last pass.
Example 2: building a loop while it plays
- Start the sequence with PLAY START. Leave it looping.
- Press OVERDUB to punch in. Play a part. Press OVERDUB again to punch out and listen.
- Punch in again for the next layer. Each pass adds to the loop.
- Hold REPEAT and hold a hat pad for straight 16ths at the TC rate. With a Push 2 or a Maschine, pressure on the pad sets the level.
Example 3: recording an outboard synth
- Pick an empty track. In SETUP (MAIN > EDIT > SETUP), set the track to MIDI TR.
- Back on MAIN, the PGM field reads CH: set the MIDI channel. 1 to 16 is port A, 17 to 32 is port B.
- Make a Live MIDI track, set its MIDI From to the 16 Levels track and its MIDI To to the synth.
- Play the synth's part on your controller. Record and overdub as with pads. Pitch bend and mod wheel record too.
The MAIN screen
| Field | What it does |
|---|---|
| SEQ | Sequence 01 to 99. Picking an empty one makes it |
| BARS | Length. Change it through EDIT > CHANGE BARS to keep the notes |
| TC | Timing Correct: OFF, 1/8, 1/8T, 1/16, 1/16T, 1/32, 1/32T. Notes snap as you record |
| SWING | 50 to 75. 50 is straight; the feel lives from 54 to 66. Applies to the TC grid |
| LOOP | ON loops the sequence; OFF plays it once |
| TR | Track 01 to 64 |
| ON / OFF | Mute the track in the sequence |
| VEL | Track velocity, 1 to 200 percent of what was played |
| TEMPO | The tempo |
| PGM (or CH) | The Program a drum track plays, or the channel of a MIDI track |
Setting the tempo, tempo changes and the tempo source
TEMPO follows Live when the source is MAS, the default. Set it to SEQ to make the sequence the boss: its tempo goes to Live when you pick it, and its tempo changes play as it passes them. MAIN > EDIT > TEMPO CHANGE opens the list: UP and DOWN step through changes, INSERT adds one, DELETE removes it, NOW sets it to the play position. Each change is a percent of the starting tempo at a bar.beat.tick. TAP sets the tempo from your taps.
Bars, loop and SETUP
EDIT > CHANGE BARS adds or removes bars without losing notes. EDIT > SETUP holds the sequence and track names, LOOP TO (the bar the loop jumps back to), SHIFT (move the whole timing early or late), the track type (DRUM TR or MIDI TR) and the track's program change.
Count-in and metronome
CLICK opens the metronome: COUNT OFF, COUNT REC or COUNT R+PLAY; click on or off while playing and while recording; RATE 1/4 to 1/32T; LEVEL; WAIT KEY (recording starts when you hit a pad); and a CLICK output. SOUND (F5) swaps the click for two of your pads, an accent and a normal hit, each with its own velocity.
Tracks
TR- and TR+ (F5, F6) step through tracks. TR MUTE (F3) mutes tracks from the pads: hit a pad to mute that track. SOLO in that window solos instead. SOLO (F4) solos the current track. EDIT holds copy, delete and move track, and ERASE OFF TRK to clear every track you have turned off.
Transport and locate
| Key | What it does |
|---|---|
| PLAY START | Plays from the start of the sequence |
| PLAY | Plays from where it is |
| STOP | Stops |
| REC | Stopped: arms recording that replaces. Playing: punches in and out |
| OVERDUB | The same, adding instead of replacing |
| << >> | Back or forward one bar |
| < > | Back or forward one TC step. With TC OFF, to the previous or next event |
| LOCATE | Go to a bar.beat.tick, TO START, TO END, STORE a marker and GO MEM to it |
While playing, F1 on MAIN is EDIT LOOP: loop a few bars of a long sequence while you work on them, then keep or undo the changes.
Auto punch
LOCATE > PUNCH sets AUTO PUNCH: IN+OUT, IN ONLY or OUT ONLY, with the in and out points as bar.beat.tick. USE LAST takes the in and out points from the last punch you made by hand with REC or OVERDUB. Arm REC or OVERDUB and play; recording starts and stops on its own at those points.
Editing sequences
Three tools: ERASE for clearing notes, STEP for one event at a time, and EDIT for whole bars, tracks and sequences.
Erasing with the ERASE key
- In real time: while the sequence plays, hold ERASE and hold the pads you want gone. Their notes erase as the playhead passes. Let go and erasing stops. Tap ERASE to latch it on, tap again to stop.
- The ERASE window: stopped, press ERASE on MAIN. Set FROM and TO bars. Hit pads to pick which notes go, or ALL PADS (F1) for everything on the track. DO IT (F5).
Step editing
Stopped, STEP (F1) on MAIN opens the event list for the current track, four events to a screen.
- << >> and < > move through time; the list follows. EVENT UP and EVENT DN (F1, F2) pick an event.
- Change its velocity, duration, note, and its Note Variation type and value with the cursor and DATA. DELETE (F3) removes it. PLAY (F4) plays from here.
- Hit a pad to put a note at the current position. With AUTO STEP Y, the position then moves one step on.
- MORE (F5) opens the second set: COPY and PASTE events, CHG PAD (hit a pad to change the event's pad), the step size, HEAR TR or HEAR ALL, and the VIEW filter (ALL, NOTES, PITCH BEND, CTRL, PROG CHG, CH PRESS, POLY PRESS, EXCL).
The EDIT screen
EDIT (F2) on MAIN. Pick a function, set its range (FROM and TO bars, and what else it needs), pick pads to limit it if you want, then DO IT. Functions that delete ask twice. UNDO takes it back.
| Function | What it does |
|---|---|
| COPY BARS | Copies a bar range to another sequence or point, as many times as you set, REPLACE or MERGE |
| INSERT BARS, DELETE BARS | Adds empty bars or removes bars |
| DOUBLE TIME, HALF TIME | Plays the range twice as fast or half as fast |
| COPY SEQ, DELETE SEQ | Copies or deletes a whole sequence |
| QUANTIZE | Moves recorded notes to the TC grid, with swing |
| VELOCITY, DURATION | Changes them by ADD, SUB, MULT % or SET |
| COPY EVENTS | Copies the notes of a range, from one track to another |
| COPY TRACK, DELETE TRACK, DEL ALL TRACKS, MOVE TRACK | Track housekeeping |
| ERASE OFF TRK | Deletes every track that is turned off |
| EDIT LOOP | Loops a few bars to work on, then keep or undo the changes |
| CHANGE TSIG | Changes the time signature of bars |
| TRANSPOSE | Shifts notes up or down |
| TEMPO CHANGE | Opens the tempo change list (Chapter 3) |
Song mode
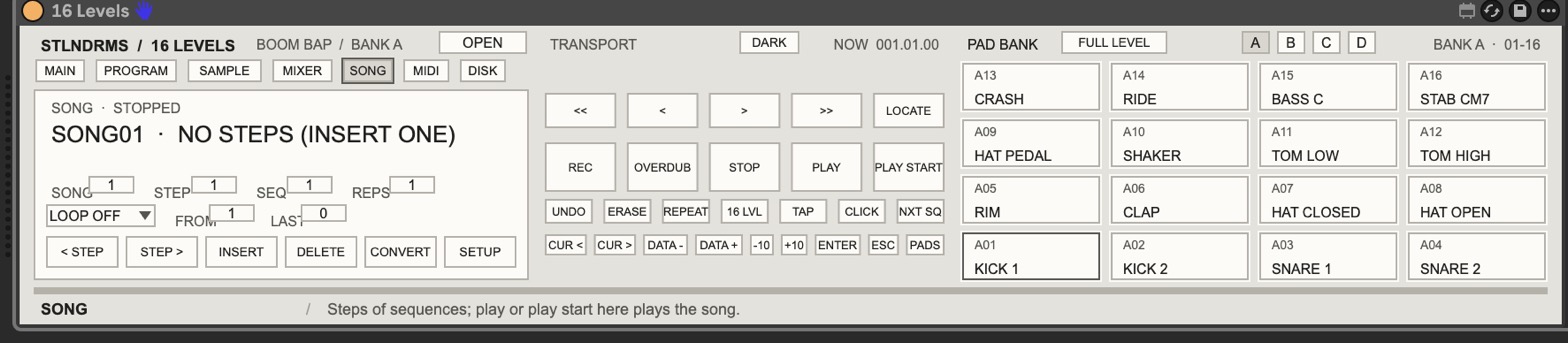
A song strings sequences together: intro, verse, hook, in order, each repeated as many times as you need. 20 songs per project. PLAY or PLAY START on the SONG page plays the song instead of a single sequence.
Building a song
- SONG page. Pick a SONG number.
- INSERT (F3) adds a step. Set its SEQ and REPS (how many times it plays).
- STEP > (F2) moves to the next step; INSERT again for the next part. < STEP goes back. DELETE (F4) removes a step.
- REPS 0 marks the end: the song stops there.
Loop, locate and tempo
LOOP ON plays the song again from the step you set. << and >> jump between steps, stopped or while it plays. Each step plays at its sequence's tempo when the tempo source is SEQ; with MAS, Live's tempo holds.
SETUP
SETUP (F6) names the song, COPY copies it to another number, and DEL SONG deletes it.
Converting a song to a sequence
CONVERT (F5) writes the whole song into one sequence: pick the sequence number, then DO IT. Use it to print a finished arrangement, or to edit across part boundaries.
Creating and editing sounds
Sampling a new sound
Record, stop, listen, then keep it or try again. A kept sound lands on the pad you pick, saved as a 24-bit AIFF in the project's 16levels/SOUNDS folder.
- Save the Live Set first.
- SAMPLE page. Set INPUT to the source, then MODE: STEREO, MONO L or MONO R.
- Set the threshold (THR OFF, or -60 to -6 dB) and pre-record (PRE 0 to 100 ms). With a threshold, recording waits for the signal; pre-record keeps the moment before it.
- Press RECORD, then START (F6). Press STOP (F6) when you have it. CANCEL (F5) drops it.
- Hit a pad to choose where it goes. PLAY (F4) previews it. Pads still play while you decide.
- KEEP (F5) saves it to that pad. RETRY (F2) throws it out and records again.

MON ON lets you hear the input through the device. PEAK holds the loudest level; RESET PK clears it. Type a name in the name field before you keep, or rename it later. LOAD FILE brings in a WAV or AIFF from disk instead.
A keep never overwrites a pad's settings. Set up a pad first (tune, envelope, filter) and the new sound takes them.
Sound memory
SOUNDS (F2) on the SAMPLE page lists every sound in the project. < SOUND and SOUND > step through them; PLAY hears one; the name field renames it. The TOOL menu, then DO IT:
| Tool | What it does |
|---|---|
| LEVEL / TUNE | The sound's own level and tuning |
| LOAD FILE | Loads a WAV or AIFF |
| ASSIGN TO PAD | Puts the sound on the selected pad |
| COPY SOUND | Makes a copy to edit separately |
| MONO / STEREO | Makes a stereo sound mono, from L+R, the left side or the right side |
| RESAMPLE | New sample rate and bit depth, for grit |
| BPM MATCH | Makes a new copy of the sound at a new tempo; the original stays |
| DELETE, PURGE, DELETE ALL | Removes one sound, the sounds no pad uses, or all of them |
MONO and RESAMPLE rewrite the file; UNDO takes back the last one.
Trim, loop and zones
On the XL, trim, loop and zones belonged to the sound. In 16 Levels the trim and loop belong to the pad, so two pads can play different slices of one sound. Hit the pad, then PROGRAM > PARAMS > TRIM.
- START and END set where the pad plays. SNAP moves them to the nearest zero crossing. RESET goes back to the whole sound.
- LOOP ON plays the loop point to END while the pad is held.
- ZOOM shows the whole sound, or x2 to x16 around START or around END, for fine work.
EDIT mode
TRIM > EDIT (F3) works on the sound between START and END:
| Tool | Changes the file? |
|---|---|
| DISCARD (keep only START to END), SILENCE, REVERSE, NORMALIZE | Yes |
| DELETE SECTION, INSERT SOUND, TIME STRETCH | Yes |
| ZONES (split into 2 to 16 zones on pads), ZONES TO SOUNDS | No, or makes new sounds |
| SECTION TO NEW (the section as its own sound) | Makes a new sound |
| LOOP START-END | No: sets the pad's loop |
DO IT asks twice for tools that change the file. UNDO (F1) takes back the last one. TO PAD puts a new sound on a pad.
BPM Match
SOUNDS > TOOL > BPM MATCH, with the sequence stopped. Set BEATS, how many beats the sound holds, and 16 Levels works out its tempo from the length; or type the source tempo yourself. Pick WHOLE for the whole sound or PAD S-E for the selected pad's START to END. NEW tempo starts at Live's tempo. Name the result, then DO IT. It makes a new sound at the new tempo and leaves the original alone; ASSIGN TO PAD puts it on a pad.
Creating and editing Programs
What Programs are
A Program decides what each of the 64 pad slots plays and how: the sound, its level and pan, tune, envelope, filter, how it overlaps itself, and what it cuts off. 24 Programs per project. A drum track plays the Program in its PGM field, so two tracks can play two kits.
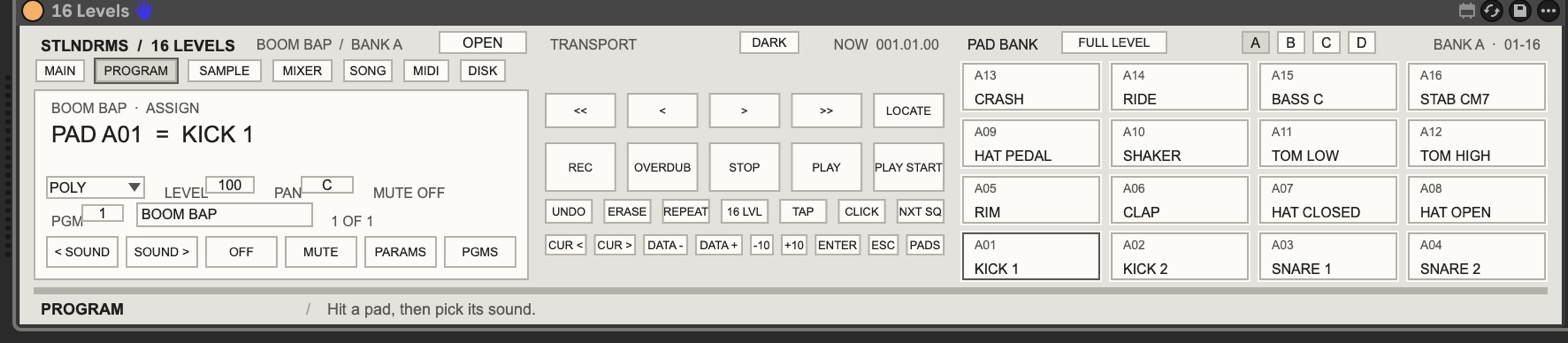
Selecting, creating and naming
PGM picks 1 to 24; a new number makes an empty Program. The name field renames it. PGMS (F6) holds the housekeeping:
| Key | What it does |
|---|---|
| NEW | A new empty Program |
| COPY | Copies the Program to another number, or copies one pad's settings to another pad |
| DELETE | Deletes this Program or all of them |
| AUTO | Auto chromatic: lays one sound across the pads in semitones from a KEY, with a tune OFFSET, and names them |
| INIT | Puts this Program, or everything, back to defaults |
Assigning sounds to pads
Hit a pad. On ASSIGN, < SOUND and SOUND > (F1, F2) pick its sound; OFF (F3) empties it. A kept sample goes straight to the pad you picked. Pad notes, the MIDI note each slot answers to, are set on the MIDI page (Chapter 11). PURGE in sound memory clears sounds no pad uses.
Sound generation: layers and switches
PARAMS > LAYER sets how a pad plays more than one sound:
- NORMAL: one sound.
- SIMULT: up to four sounds at once.
- VEL SW: velocity picks the sound, with the switch points you set.
- DCY SW: the decay setting picks the sound.
Note parameters
| Window | What you set |
|---|---|
| ASSIGN | Voice Overlap: POLY (notes ring over each other), MONO (a new hit cuts the last), NOTE OFF (plays while held). LEVEL, PAN |
| PARAMS | TUNE, ATTACK, DECAY (to END of the sound, or from START), FILTER, RESONANCE, and velocity to level |
| FILTER | The filter envelope: how the filter moves over the note |
| NOTE VAR | Note Variation type and LO to HI range (Chapter 2) |
| TRIM | Where the pad plays in the sound, its loop, and the EDIT tools (Chapter 6) |
Mute groups
MUTE (F4) on ASSIGN: hit the pads this pad cuts off, like an open hat cut by a closed hat. CLEAR empties the list; PROGRAM makes the pad cut every other pad in the Program. Hit pads normally to hear it.
Mixer functions
The MIXER page shows 16 faders for the bank on screen. Hit a pad to select it for PAN and OUT.
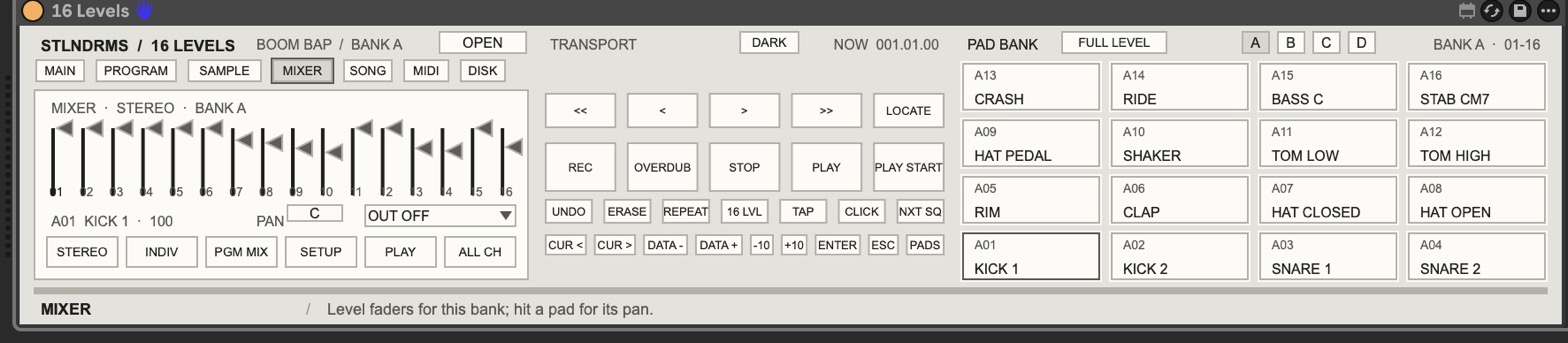
Stereo output mixer
STEREO (F1): each fader is a pad's level in the main mix on this track; PAN places it. ALL CH (F6) links the faders, so one moves the whole bank.
Individual outputs
INDIV (F2) shows the level each pad sends to its individual out. OUT picks OUT 1 to 8 for the selected pad. The first time, 16 Levels makes a Live audio track named MPC OUT n, and the pad plays there and in the main mix at the same time, as on the XL. Turn its stereo fader to 0 to take it out of the main mix. FOLLOW makes the individual level follow the stereo fader.
This is how you run a beat into the session and out to a console at once: stereo mix on the 16 Levels track, each OUT track on its own console channel.
Drum mixers and SETUP
F3 picks which mixer you are editing: the Program's own (PGM MIX) or DRUM 1 to 4. SETUP (F4) chooses where the stereo and individual mixes come from (the Program or a drum mixer), whether recording captures mix moves, and CLR MIX.
Mix changes take effect on the next hit, not on a note already ringing.
Effects
The XL's effects board was an option. 16 Levels has no effects inside: Live hosts them. Put effects after the device on its track for the whole mix, or on the MPC OUT tracks for single pads. A return track in Live does what the XL's effect sends did.
Disk operation
There are no floppies to format. Your work saves on its own into a 16levels folder beside the saved .als:
| Path | What is in it |
|---|---|
| 16levels/SOUNDS | Every kept or loaded sound, 24-bit AIFF |
| 16levels/16levels.json | Programs, sequences, songs and settings, written as you work |
| 16levels/PROGRAMS, 16levels/SEQUENCES, 16levels/ALL | Files you save from the DISK page |
Keep the .als and its 16levels folder together when you move or back up a project. A project saved with an earlier beta has an MPC folder and MPC.json instead. It keeps using them, so nothing needs moving.
Saving and loading
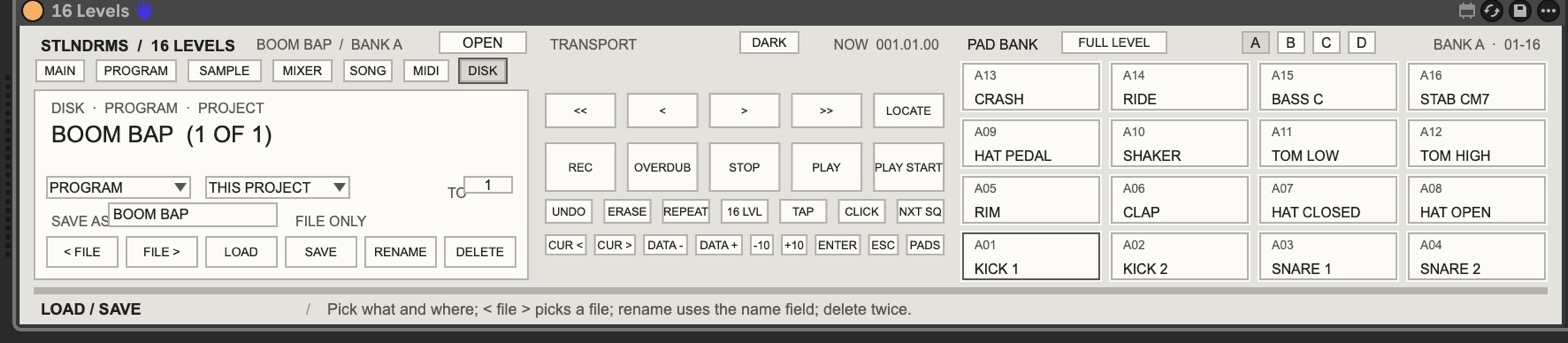
- Pick the type: PROGRAM, SEQS + SONGS, ALL, MIDI FILE, or MPC 2000XL.
- Pick where: THIS PROJECT, or the LIBRARY (~/Music/16 Levels). The library carries the sounds along, so any Set can load it. It plays the part SCSI folders played on the XL.
- SAVE writes it under the SAVE AS name. < FILE and FILE > pick a file; LOAD loads it. RENAME uses the name field. DELETE asks twice.
Loading sequences can go into other numbers: FROM and TO pick where.
Loading MPC 2000XL files
- TYPE MPC 2000XL, then FOLDER (F4). Pick the beat's folder, the one with its .ALL, .APS and .SND files.
- ALL BEAT (F5), then again to confirm. It loads the sequences, songs, Programs and sounds.
- Set Live's tempo to the beat's. The status line shows it.
One file at a time works too: < FILE, FILE >, LOAD, for .ALL, .APS, .PGM, .SND or .MID. Stereo sounds the XL saved as two files (-L and -R) load as one stereo sound when both halves are there.
Saving back to the 2000XL
SAVE (F6) in MPC 2000XL mode writes .ALL, .APS, .PGM and .SND files to take to the real machine. A few things have no place in XL files and stay behind: pad trims that differ from the sound's trim, MUTE PROGRAM, and negative filter envelope amounts.
MPC60 files and Flash ROM, covered in the XL manual, are not part of 16 Levels.
MIDI and OTHER
The XL's MIDI/SYNC and OTHER modes live on the MIDI page. Sync is Live's job: 16 Levels always runs on Live's clock.
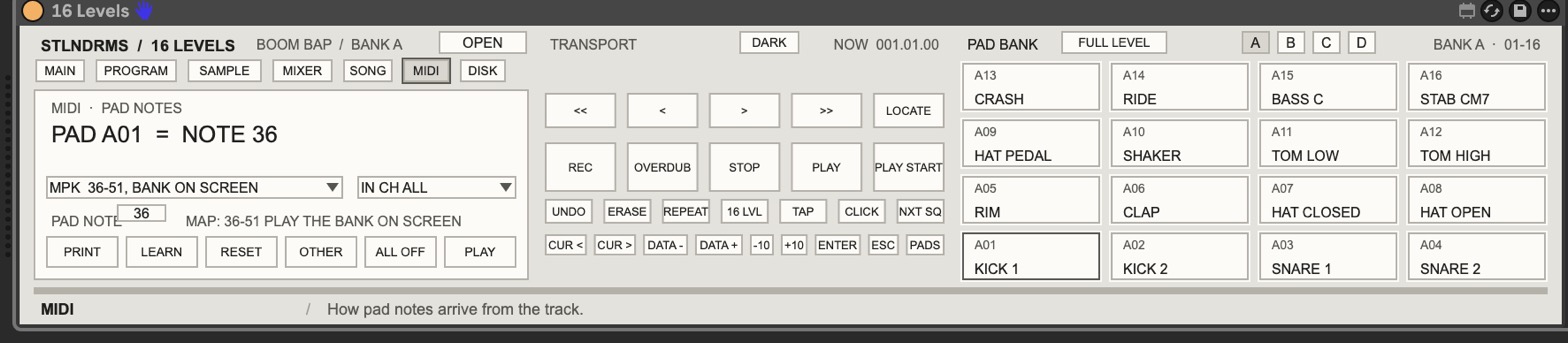
Pad notes
| Setting | What it does |
|---|---|
| NOTE MAP | MPK 36-51: notes 36 to 51 play the bank on screen, pad 1 = 36. 2000XL 35-98: the XL's own map, all four banks at once |
| IN CH | Take notes from one channel, or all |
| PAD NOTE | The note of the selected pad |
| LEARN (F2) | The next note you play becomes the selected pad's note |
| RESET (F3) | Puts the map back |
| ALL OFF (F5) | Stops every note, here and on the MIDI outs |
MIDI tracks and the two ports
A MIDI track (Chapter 3) plays out of the device on its channel. Channels 1 to 16 are port A, out of the 16 Levels track. For 17 to 32 (1B to 16B), put 16 Levels Port B.amxd on its own MIDI track and set that track's MIDI To to the second synth. Use one 16 Levels per Set when you use port B.
PRINT to Live
PRINT (F1) writes a sequence or a song into a Live clip, in Session or Arrangement, on the MIDI track you pick. Pads land on Drum Rack notes, A01 = C1. It carries notes only; controller and pitch bend moves travel in a saved MIDI file (DISK > MIDI FILE).
OTHER
OTHER (F4) on the MIDI page:
| Setting | What it does |
|---|---|
| TAP AVG | How many taps TAP averages: 2, 3 or 4 |
| PGM CHG | Program change messages in switch Programs |
| VEL PLAYED / VEL FIXED | Fixed velocity for every hit, at the value you set |
| CTRL | CTRL OFF, PUSH ON or MASCHINE: 16 Levels on a Push 2 or a Maschine (Chapter 12). Kept in the Set |
| KEYS OFF / ON | The older computer keyboard layer for the OPEN window. Leave it OFF and use Live's Key Map (Chapter 12) |
| BUTTONS (F2) | Learn controller buttons for REC, OVERDUB, ERASE, NOTE REPEAT, PLAY, STOP and more |
| KEY (F3) | Paste your key. The main line shows LICENSED, or the trial days left |
The version line shows which build you have, and your name once a key is in. Put it in any bug report.
Controllers
The XL had one panel. 16 Levels gives you four ways in: the computer keyboard, a pad controller, a Push 2 and a Maschine MK3 or Maschine+. The keyboard and a pad controller work alongside either one. Push and Maschine take turns: the CTRL menu picks one.
Computer keyboard
The templates come with every panel key mapped through Live's Key Map. It works from Live's main window. Print Keymap (print me).html and keep it by the keyboard.
| Area | Keys |
|---|---|
| Transport | P PLAY, S STOP, B PLAY START, R REC, O OVERDUB |
| Move | J <<, comma <, period >, = >>, G LOCATE |
| Panel | E ERASE, N NOTE REPEAT, U UNDO, L 16 LEVELS, T TAP, C CLICK, X NEXT SEQ, F FULL LEVEL |
| Cursor and data | ; and ' cursor, [ and ] DATA - / +, Z and V -10 / +10, / ENTER, Q CLOSE, ` KEY PADS |
| Soft keys and banks | 1 to 6 for F1 to F6, 7 8 9 0 for banks A to D |
| Pages | M MAIN, K PROGRAM, A SAMPLE, I MIXER, Y SONG, H MIDI, D DISK |
Space stays with Live, and since Live is the clock, Space starts the sequence too. Key Map lives in the Set: a 16 Levels dragged into another Set has no keys until you map them (cmd+K, click a control, press a key, cmd+K).
The keyboard gives taps, not holds. R arms REC and P starts. E turns ERASE on, you hit pads, E turns it off. Same for O and N.
Pad controller
Pads play on notes 36 to 51 by default, pad 1 lower left. LEARN on the MIDI page maps any controller. For real holds, the way the XL panel works (hold REC and press PLAY, hold ERASE while you hit pads), learn buttons: MIDI > OTHER > BUTTONS, pick REC, OVERDUB, ERASE, NOTE REPEAT, PLAY, STOP and so on, press LEARN, press the button. A learned button never plays a pad.
Push 2
16 Levels can take over a Push 2. The screen shows the 16 Levels display, the 64 pads play all four banks, the buttons and knobs run the panel, and the lights follow what 16 Levels is doing.
How it works
Normally Live's own Push script owns the Push. The setup frees it: the Push2 Control Surface row goes to None, and 16 Levels talks to the Push directly. A helper inside the device draws the screen over USB and reads the pads, buttons and knobs on the Push's User Port. It puts the Push in User mode, turns on pad pressure and loads its own light colors.
The screen only redraws when something changes. Nothing goes through a Live track, so the pads don't play twice as long as Track is off on the User Port.
Set it up once
- Quit Live and double-click Push 2 setup.command. If macOS blocks it, right-click, Open, then Open again. It adds one line to Live's Options.txt. Run it again after each Live update.
- Live > Settings > Link, Tempo & MIDI > Control Surface: set the Push2 row to None. Leave its Input and Output alone.
- Same tab, MIDI Ports: turn Track off for the Ableton Push 2 (User Port) input. With it on, pads play twice.
- Open the 16 Levels Push template, or set MIDI > OTHER > CTRL to PUSH ON. The footer shows PUSH MIDI and the screen comes on.
CTRL is kept in the Set, so a Set saved with PUSH ON opens with it on.
The controller
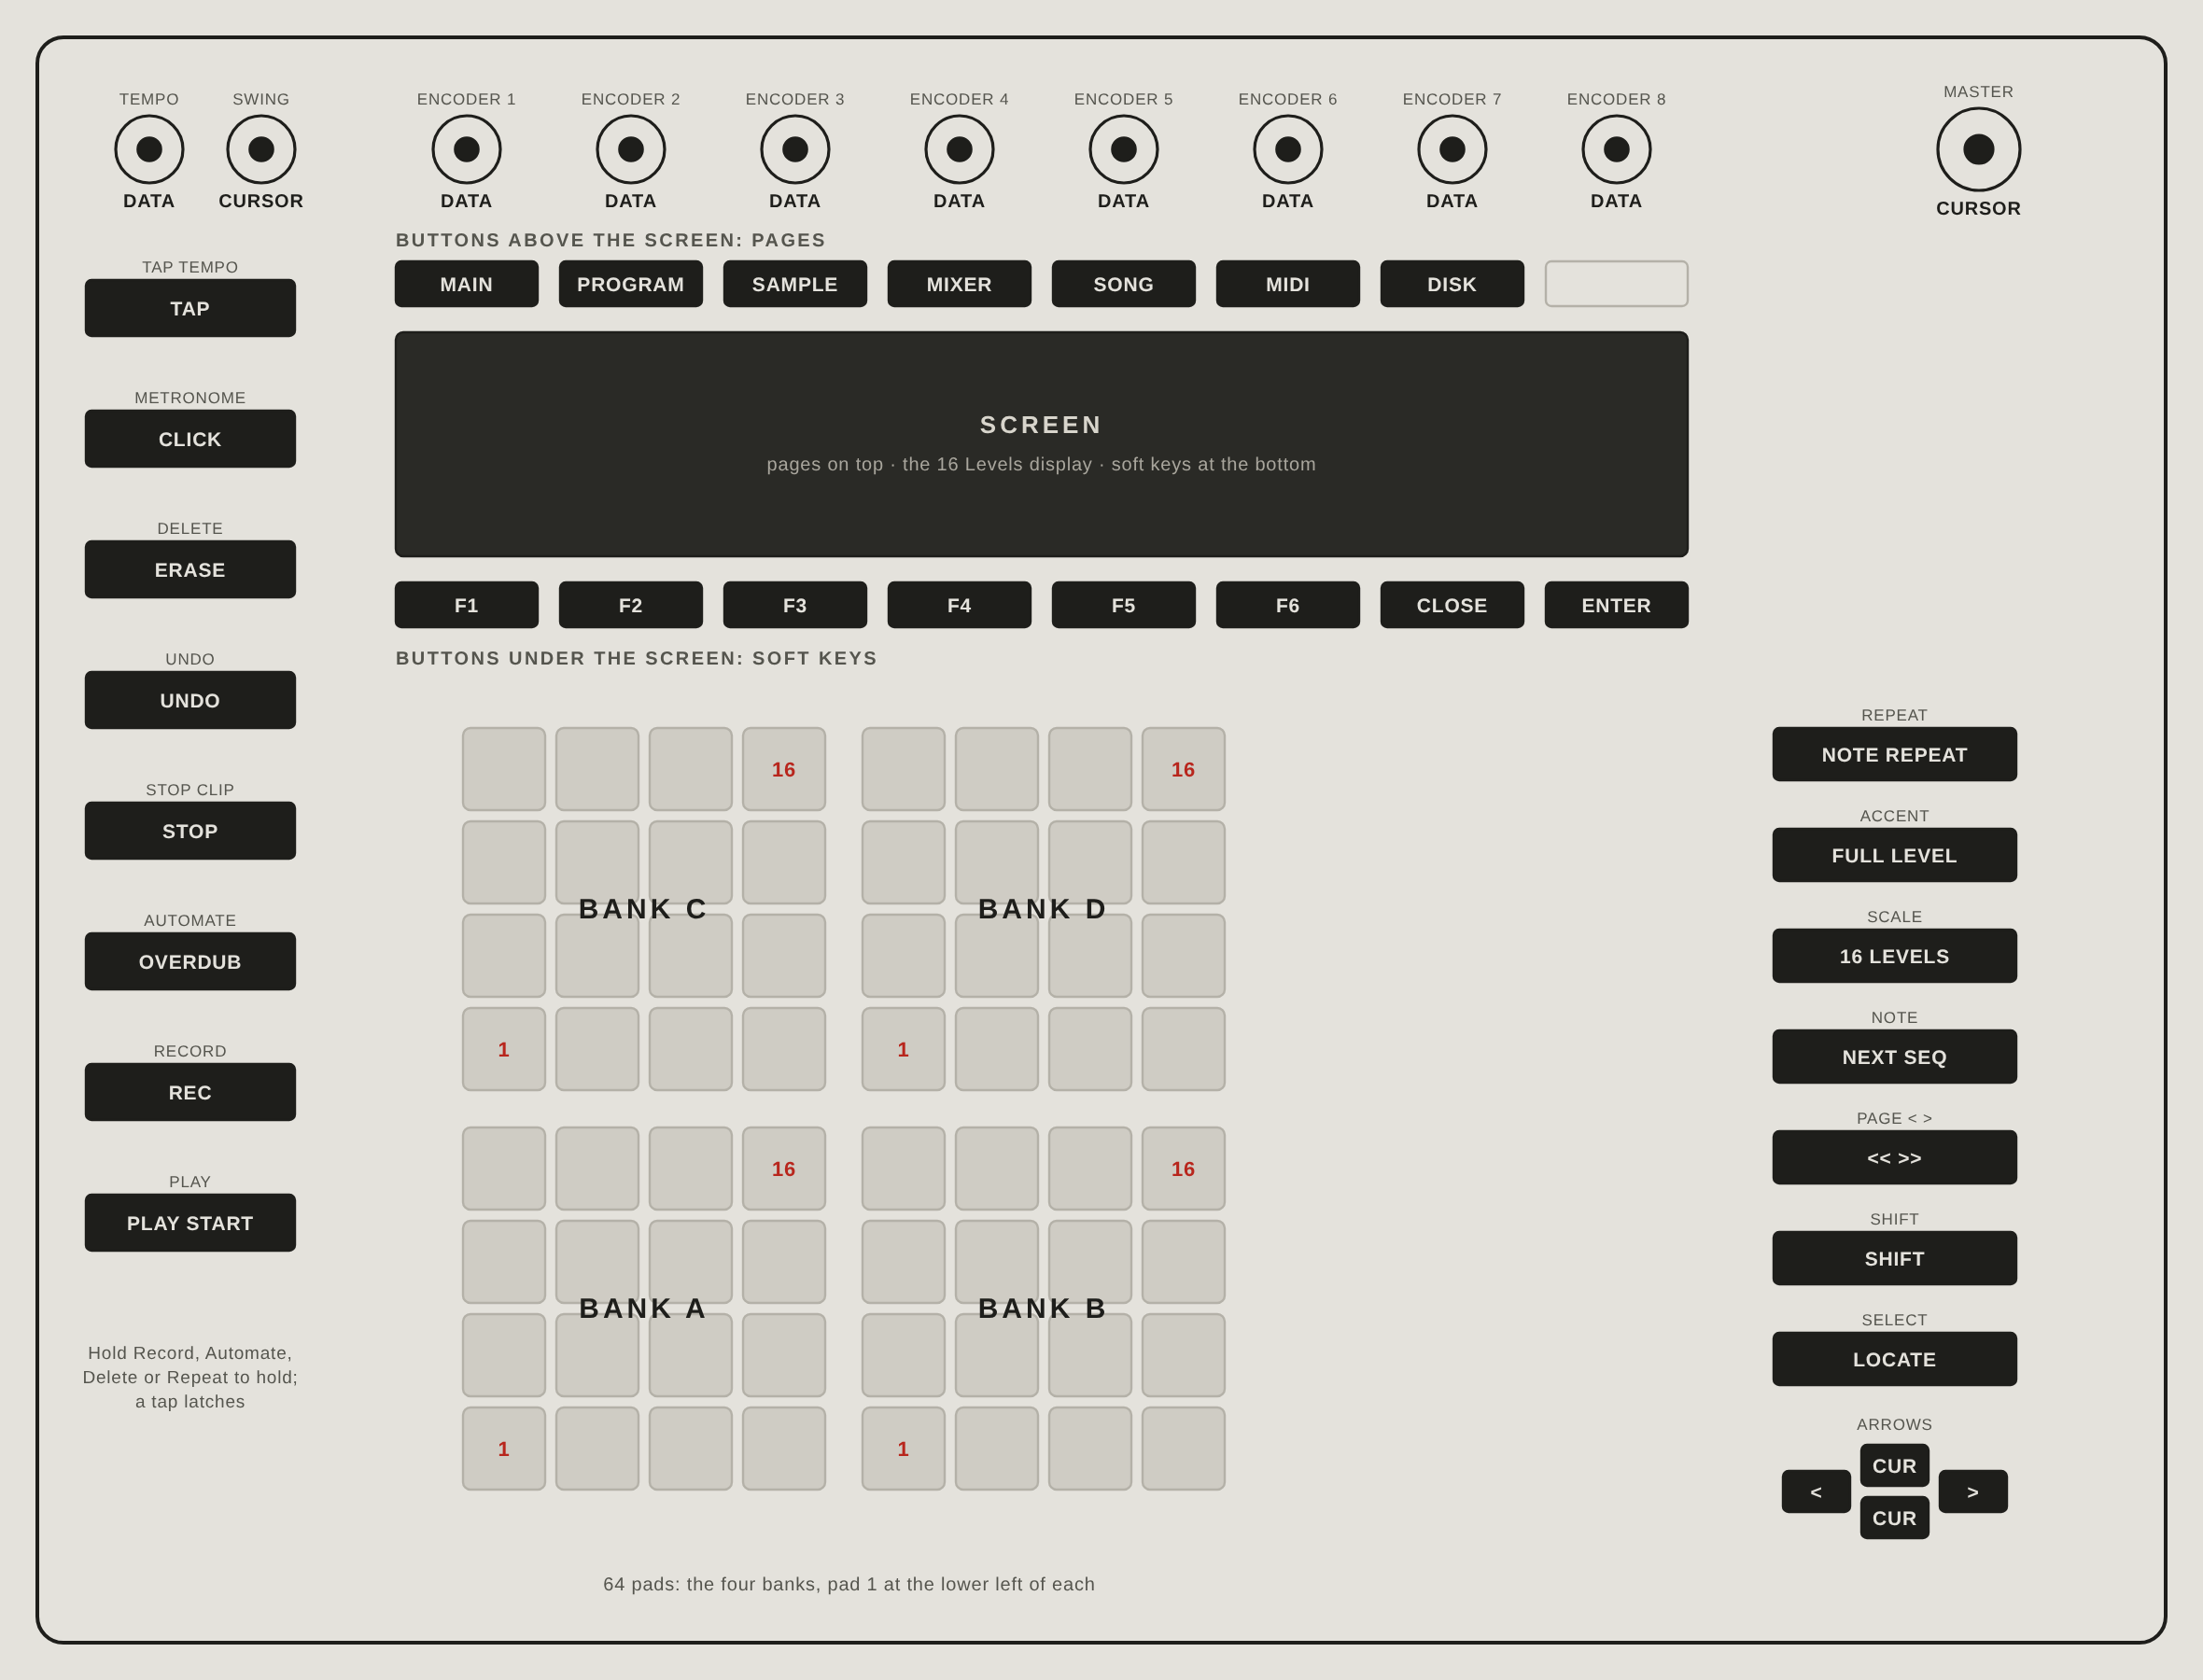
The screen
The screen follows the OPEN window field for field.
- Top row, over the 8 buttons above the screen: the pages, MAIN to DISK, with the current one underlined, and the bank.
- The middle: the 16 Levels display. The field under the cursor has a red border.
- Under it: the status line and the sequence position.
- Bottom row, over the 8 buttons under the screen: F1 to F6, CLOSE and ENTER, as the page names them.
The screen uses the light colors. Turn DARK on in 16 Levels and the Push goes dark too.


Pads
The 64 pads are the four banks, each in MPC order with pad 1 at its lower left:
| Push pads | Left half | Right half |
|---|---|---|
| Top four rows | Bank C | Bank D |
| Bottom four rows | Bank A | Bank B |
A pad with a sound is lit, brighter in the current bank. The selected pad is red. A pad turns white while you hold it. Pads send their release too, so NOTE REPEAT, ERASE and NOTE OFF work. Pressure on a pad held under NOTE REPEAT sets its level.
Buttons and knobs
| Push 2 | 16 Levels |
|---|---|
| Record, Automate, Delete, Repeat (hold) | REC, OVERDUB, ERASE, NOTE REPEAT. A tap latches |
| Play | PLAY START when stopped, STOP when playing |
| Shift + Play | PLAY, from where it is |
| Stop Clip | STOP |
| Left / Right | < / >. With Shift: << / >> |
| Page Left / Page Right | << / >> |
| Select | LOCATE |
| Up / Down | Cursor |
| Undo | UNDO |
| Tap Tempo | TAP |
| Metronome | CLICK |
| Note | NEXT SEQ |
| Accent | FULL LEVEL |
| Scale | 16 LEVELS |
| 7 buttons above the screen | Pages, MAIN to DISK |
| 8 buttons under the screen | F1 to F6, CLOSE, ENTER |
| Tempo knob | DATA, one step a click |
| Swing knob | Cursor, one field every 6 clicks |
| 8 track encoders | DATA, x10 with Shift |
| Master encoder | Cursor, one field about every 30 clicks |
Lights
REC and OVERDUB light red while recording and amber when armed. Delete, Repeat, Accent and Scale light white when they're on. Play is green while playing. The page buttons and soft keys light when they have something to do.
Giving it back
CTRL OFF clears the lights and puts the Push back in Live mode. Then set the Push2 Control Surface row back to Push2. To drop the setup for good, take the line back out of Options.txt and restart Live.
If the screen goes black, note the time and what you clicked. The helper writes 16levels_push_log.txt in the 16 Levels folder. A stuck frame restarts the screen in about half a second.
Maschine MK3 and Maschine+
16 Levels can take over a Maschine MK3, or a Maschine+ in controller mode. The left screen shows the 16 Levels display, the right screen shows the 16 pads of the bank you're on, and the pads, buttons, knobs and touch strip all work. No setup script and no Live settings to change.
How it works
Native Instruments' background helpers, NIHostIntegrationAgent and NIHardwareAgent, normally own the controller. With MASCHINE on, 16 Levels quits them and opens the controller itself over USB. A helper inside the device draws both screens and reads the pads, buttons, knobs and touch strip. Only the parts of a screen that changed get sent, at most 10 times a second.
CTRL OFF, or removing 16 Levels from the track, starts NI's helpers again so the Maschine software gets the controller back. Restarting the Mac does the same.
Set it up
- Maschine+: connect USB, then Settings > System > Controller. Without the power supply it starts in controller mode. Maschine MK3: connect USB.
- Quit the Maschine software if it's open.
- MIDI > OTHER > CTRL: MASCHINE. The status line says when the Maschine is connected.
CTRL is kept in the Set, so a Set saved with MASCHINE opens with it on.
The controller
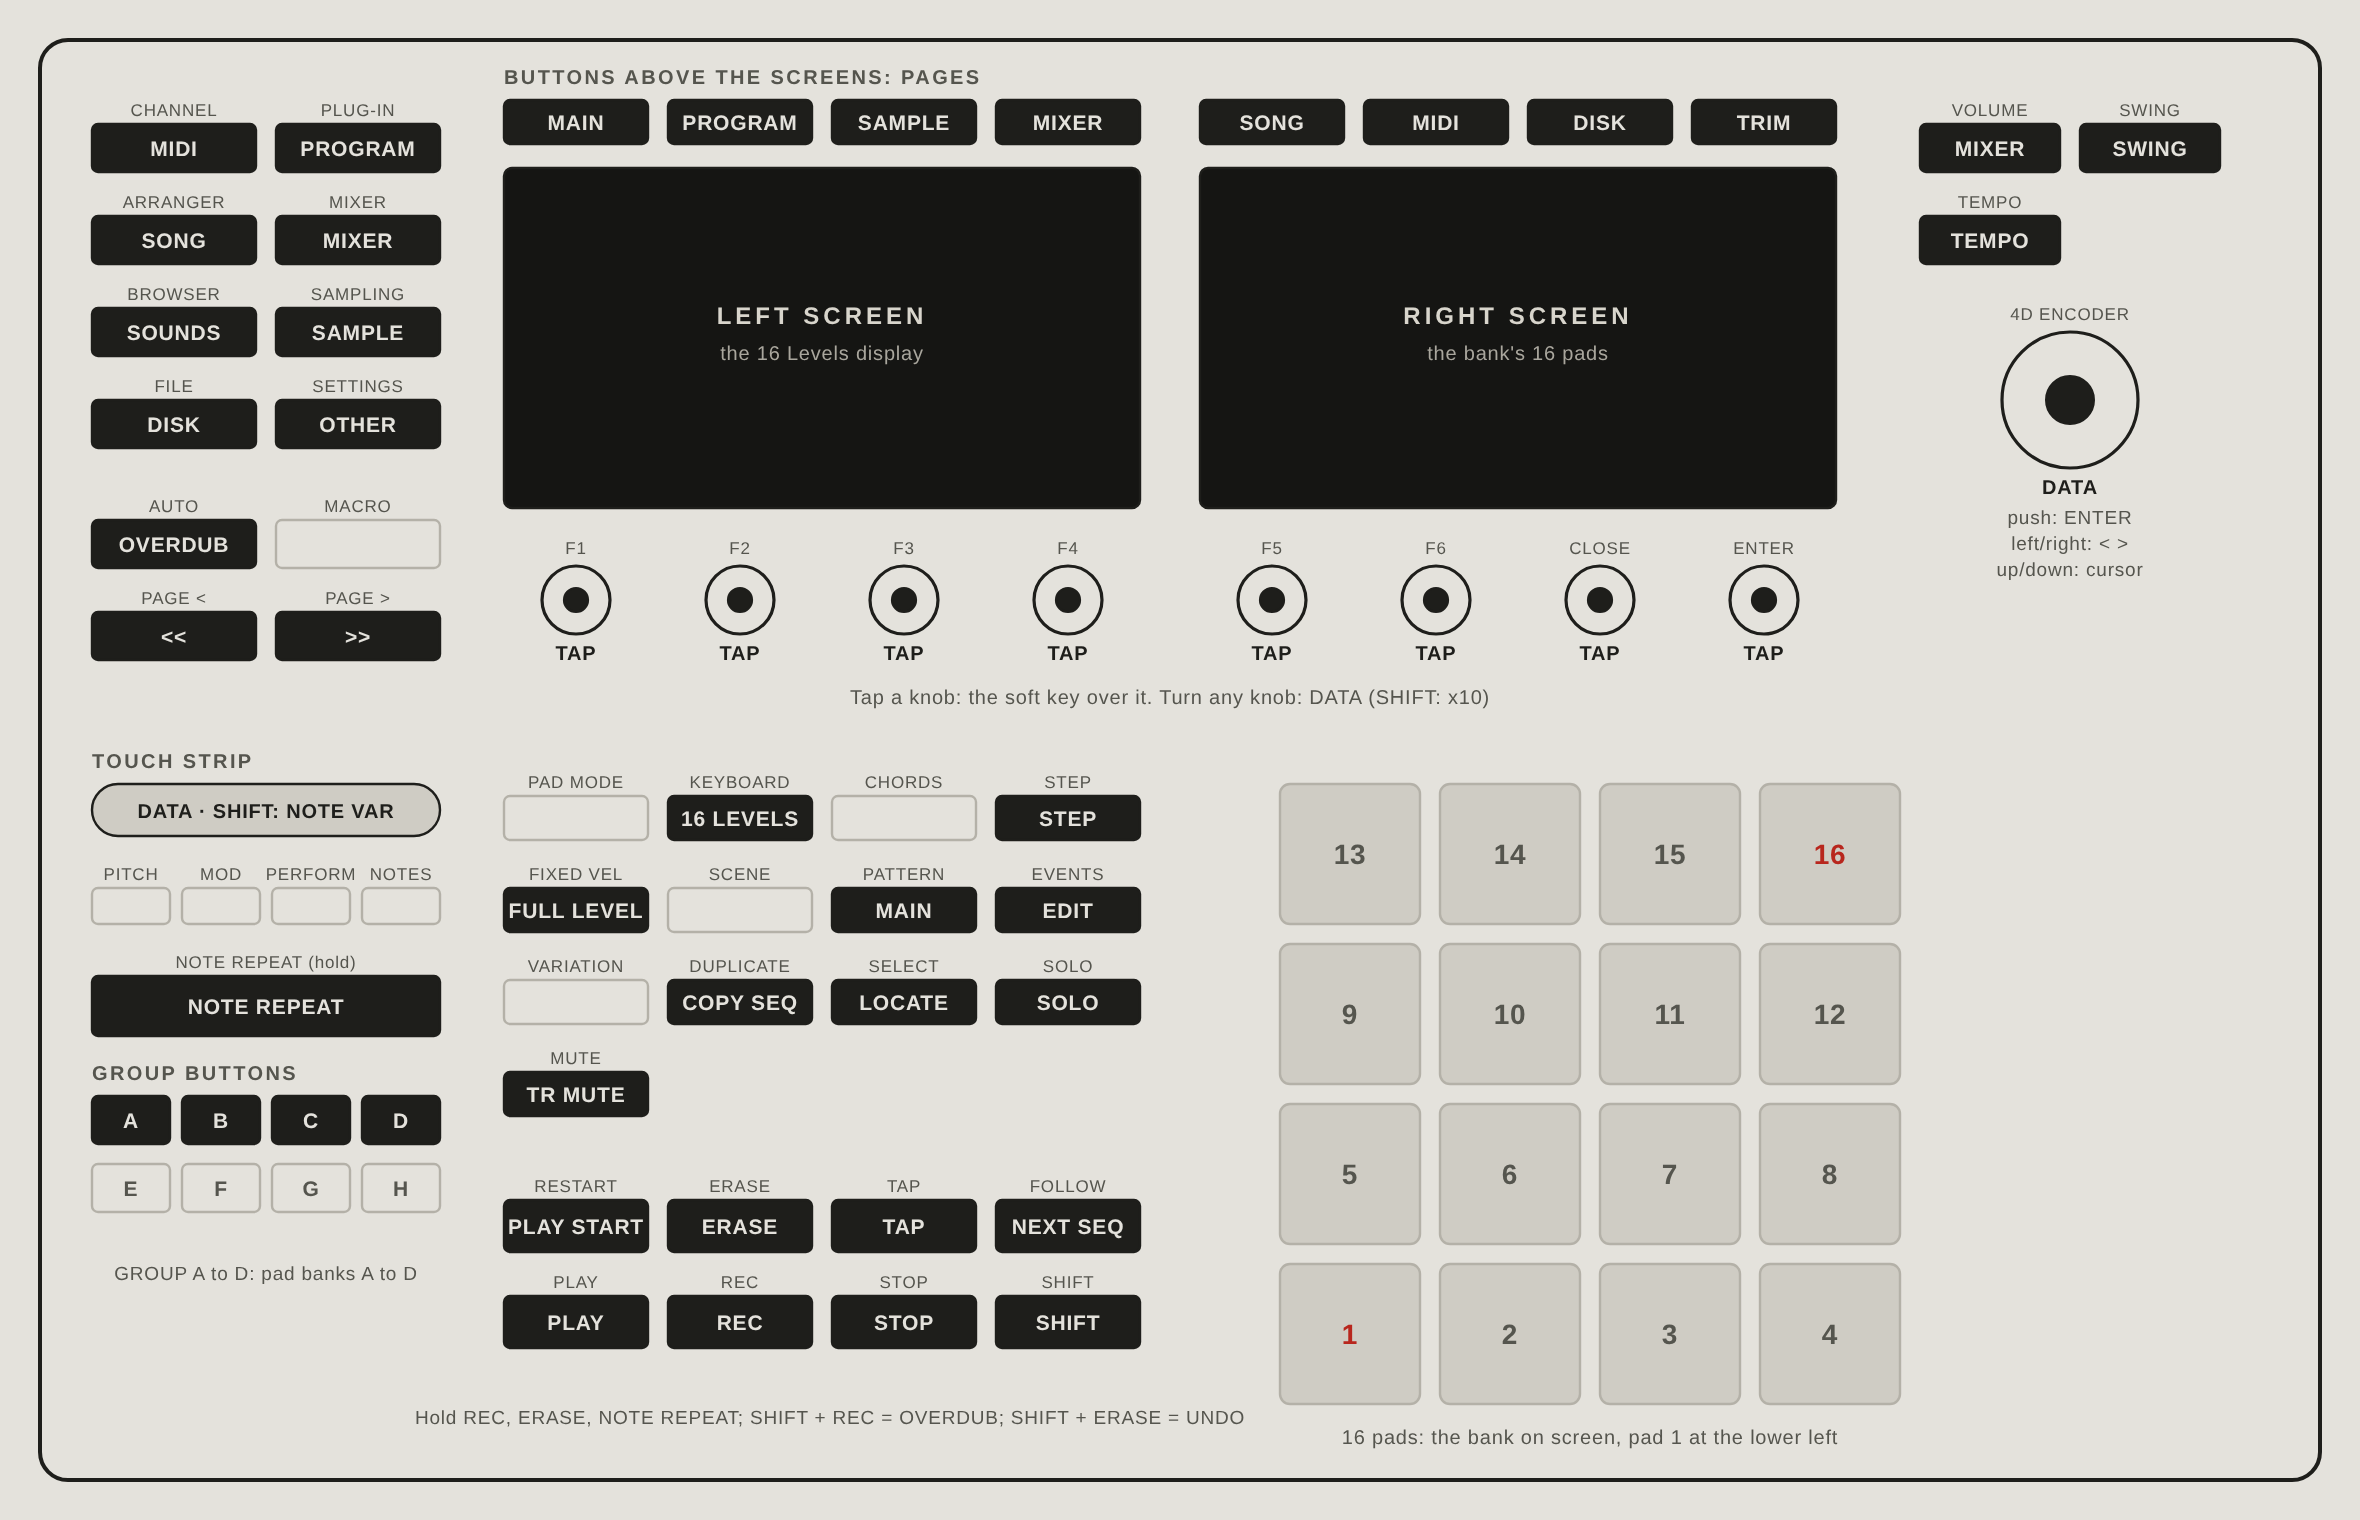
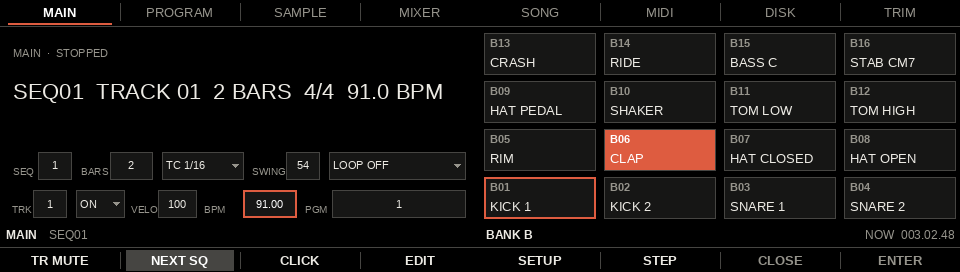
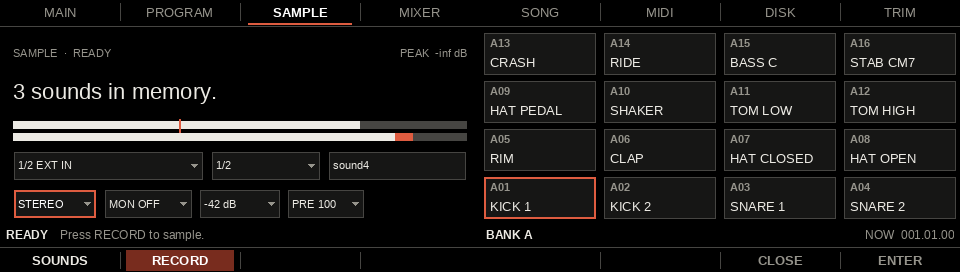
The screens
- Top row across both screens, over the buttons above them: the pages, MAIN to DISK, with the current one underlined, and TRIM on button 8.
- Left screen: the 16 Levels display. The field under the cursor has a red border. Under it, the status line.
- Right screen: the 16 pads of the bank on screen in MPC order, with their sound names. The selected pad has a red frame and a held pad lights up. Under it, the bank and the sequence position.
- Bottom row across both screens, over the knobs: F1 to F6, CLOSE and ENTER. CLOSE only shows when the page has no CLOSE of its own.
The screens start dark. SHIFT + SETTINGS switches them to light and back, and 16 Levels remembers the choice.
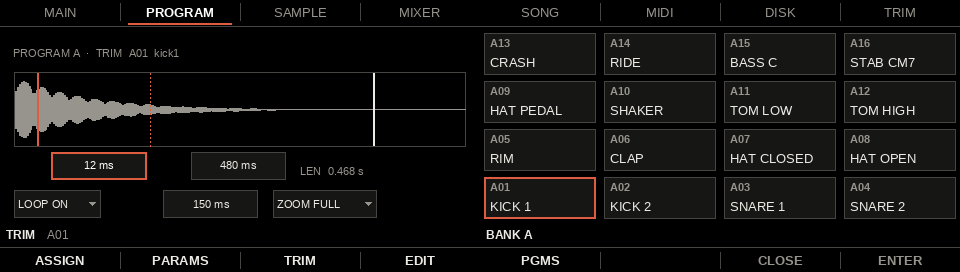
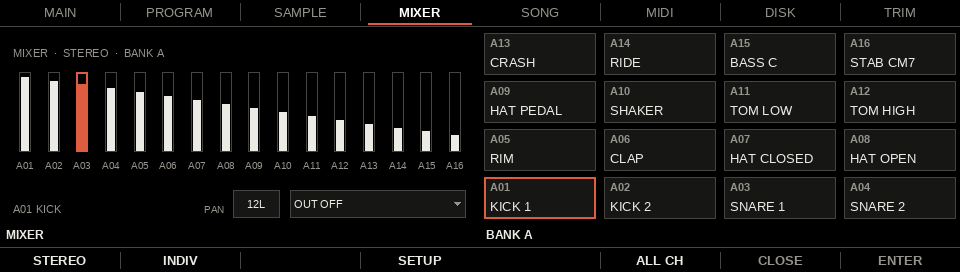
Pads
The pads play the bank on screen in MPC order, pad 1 at the lower left. GROUP A to D pick the bank. A pad with a sound is lit, the selected pad is red, a held pad turns white. Velocity comes from the hit. Pressure on a pad held under NOTE REPEAT sets its level.
Knobs and the touch strip
Tap a knob to press the soft key over it. A tap is a touch let go within about half a second without turning. The label lights while your finger is on the knob. Turning any of the 8 knobs, or the 4D encoder, is DATA, x10 with SHIFT.
The touch strip is a DATA slider for the field under the cursor: slide right to raise it, left to lower it. With SHIFT held it's the 2000XL Note Variation slider, 0 to 127, from any page, and the strip lights show the value. Pick the parameter and pad on PROGRAM > PARAMS > NOTE VAR.
Buttons
| Maschine | 16 Levels |
|---|---|
| REC, SHIFT + REC, ERASE, NOTE REPEAT (hold) | REC, OVERDUB, ERASE, NOTE REPEAT. A tap latches. AUTO is OVERDUB too |
| PLAY, RESTART, STOP | PLAY, PLAY START, STOP |
| Buttons 1 to 7 above the screens | Pages, MAIN to DISK |
| Button 8 above the screens | TRIM (PROGRAM > PARAMS > TRIM) |
| GROUP A to D | PAD BANK A to D |
| Page arrows left / right | << / >> |
| 4D encoder left / right, up / down, push | < / >, cursor, ENTER |
| SELECT | LOCATE |
| TAP (SHIFT: METRO) | TAP (SHIFT: CLICK) |
| FOLLOW | NEXT SEQ |
| FIXED VEL | FULL LEVEL |
| KEYBOARD | 16 LEVELS |
| SHIFT + ERASE | UNDO |
| DUPLICATE | Copy this sequence to the next empty number and go there. While playing, it starts when this loop ends |
| SHIFT + SETTINGS | Screens dark or light |
Some buttons jump straight to a page or a field:
| Maschine | Goes to |
|---|---|
| PATTERN, PLUG-IN, SAMPLING, MIXER, ARRANGER, CHANNEL, FILE | MAIN, PROGRAM, SAMPLE, MIXER, SONG, MIDI, DISK |
| STEP, EVENTS | MAIN > STEP, MAIN > EDIT |
| MUTE, SOLO | MAIN > TR MUTE, MAIN > SOLO |
| TEMPO, SWING | MAIN with the cursor on TEMPO or SWING. Turn a knob to change it |
| VOLUME | MIXER |
| BROWSER | SAMPLE > SOUNDS |
| SETTINGS | MIDI > OTHER |
NOTES, LOCK, PAD MODE, CHORDS, SCENE, VARIATION, PITCH, MOD, PERFORM, MACRO and GROUP E to H do nothing yet.
Lights
The pads with a sound in the current bank are grey, the selected pad red, a held pad white. The current page's button and the current bank's GROUP button light. REC and PLAY follow the transport, held keys light while they're on, and the shortcut buttons glow dim.
Giving it back
Set CTRL OFF. 16 Levels lets go of the controller and starts NI's helpers again, and the Maschine software can use it. If the screens freeze, unplug the USB and plug it back in, and note what page you were on. The helper writes 16levels_maschine_log.txt in the 16 Levels folder.
Tested on a Maschine+. The MK3 uses the same protocol but hasn't been tried on hardware yet. The Maschine Mikro isn't supported.
Limits, troubleshooting and the beta
Known limits
No effects and no plug-in instruments inside. Live hosts those. No hardware sync, no MPC60 or S1000 files, no Flash ROM. PRINT to Live clips carries notes only. Controller and pitch bend moves travel in a saved MIDI file. Live may not pass program change messages into the device, so recording them may not work. Playing them back does. Mix changes take effect on the next hit. The keyboard gives taps. Real holds come from learned buttons, the Push 2 or a Maschine. It works like the machines. It does not model their sound yet.
When something is off
| What you see | What to do |
|---|---|
| KEEP does nothing, or sounds do not come back | Save the Live Set first. The 16levels folder lives beside the .als |
| A pad is silent | Check the pad has a sound (PROGRAM > ASSIGN), its level on MIXER, and the track's output in Live |
| Recording hears nothing | Check INPUT on the SAMPLE page and the source's routing in Live; watch PEAK |
| Pads play twice from the Push | Turn Track off for the Ableton Push 2 (User Port) input in Live's MIDI settings |
| The status line says Live holds the Push | Set the Push2 Control Surface row to None. No Push2 row? Run Push 2 setup.command and restart Live |
| The Push screen goes black | Note the time and what you clicked. 16levels_push_log.txt in the device folder records it. CTRL OFF and back to PUSH ON restarts it |
| The Maschine screens freeze | Unplug the USB and plug it back in. Note what page you were on. 16levels_maschine_log.txt in the device folder records it |
| The Maschine software can't see the controller | Set CTRL OFF, or remove 16 Levels. That starts NI's helpers again. Restarting the Mac does too |
| A new version does not show up | Delete the device and drag it back in, or reopen the Set |
| The status line says the trial has ended | Enter your key: MIDI > OTHER > KEY, or put 16 Levels License.txt in the 16 Levels folder |
| The key does not check out | Paste the whole key, starting with 16L-. Or use the license file instead of pasting |
| The keys do nothing | Key Map lives in the Set. Open a template, or map the keys in this Set |
Before studio monitors are on, check Live's output and Main fader.
For the beta team
This build is for a few friends and Sidechain members. Tell me what trips your hands up, even when it matches the manual. Useful notes say what you pressed, what you expected, and what happened, with the version line from MIDI > OTHER. Screenshots and the Push or Maschine log help.
Worth trying first: load an old 2000XL beat, sample something and chop it into zones, record with swing at your tempo, and play it all from the Push. On Live 11, or on Windows? It has not been tried there. Tell me whether it loads and what breaks.
Quick key reference
Use the supplied Keys template; Live's Key Map is stored with the Set. A device dragged into a new Set does not automatically inherit the shortcut layer. Keyboard taps do not substitute for physical held buttons.
| Area | Keys |
|---|---|
| Transport | P Play · S Stop · B Play Start · R Rec · O Overdub |
| Move / Locate | J << · , < · . > · = >> · G Locate |
| Panel | E Erase · N Note Repeat · U Undo · L 16 Levels · T Tap · C Click · X Next Seq · F Full Level |
| Cursor / Data | ; / ' cursor · [ / ] Data -/+ · Z / V -10/+10 · / Enter · Q Close · ` Key Pads |
| Soft keys / Banks | 1 to 6 = F1 to F6 · 7/8/9/0 = Banks A/B/C/D |
| Pages | M Main · K Program · A Sample · I Mixer · Y Song · H MIDI · D Disk |
MIDI and controller notes
The default MPK mapping plays notes 36 to 51 on the currently displayed bank. The alternative 2000XL map uses notes 35 to 98 across all four banks. MIDI > LEARN can assign a controller note to a pad. For REC, OVERDUB, ERASE or NOTE REPEAT held behavior, use MIDI > OTHER > BUTTONS to learn dedicated controller buttons.
Port A uses channels 1 to 16. Port B uses 17 to 32 (1B to 16B) with the 16 Levels Port B.amxd companion device. Follow Chapter 11 routing and use one 16 LEVELS instance per Set when using Port B.
Export and project checklist
- Save the Live Set first; confirm an adjacent 16levels folder exists after recording.
- Keep the original .als and 16levels directory together when copying or archiving.
- Back up before destructive sample editing or exporting back to MPC 2000XL formats.
- For PRINT to Live clips, expect notes only. Use a MIDI file for controller or pitch-bend data.
- After copying a project, reopen the destination and verify sounds, sequences, programs and individual outputs.
- With Push 2, restore Live Control Surface preferences when you exit 16 LEVELS mode.
Beta test report
Use this template when reporting issues to the developer or beta group. Avoid sending copyrighted samples or unrelated personal files with a report.
| Field | What to include |
|---|---|
| Build | Version shown in MIDI > OTHER |
| Environment | macOS version, Live version and Max for Live edition |
| Control path | Keyboard, MIDI controller, Push 2 or mouse |
| Steps | Exact page, control, order of operations and input source |
| Expected / Actual | What you expected and what happened instead |
| Reproducibility | Once, intermittent, or every time; whether a fresh Set reproduces it |
| Files | Screenshot; Push log if applicable; a minimal test Set only if safe to share |
Suggested first tests: record an external source with KEEP / RETRY, chop a sample into zones, make a two-bar sequence with swing, save and reopen, route a pad to an individual output, test PRINT against MIDI FILE, import and export an MPC 2000XL project, and test Push 2 takeover and restore.